Effective automation starts with a goal in mind and optimizes for each action along the way. By using email response programs, you can further develop distinct nurturing experiences for your Targets.
With response programs, you can easily follow a Targets’ interactions based on your designed workflow. Using Email Response Programs in Chainlink’s Marketing Platform, you can create custom workflows scheduled to be sent out at specific times, containing a custom email that can point to one of your landing pages. Chainlink’s Marketing Platform has the ability to track all of your email stats, as well as your landing page stats, so you can see which Targets opened your email and clicked through to your landing page. Response Programs also give you the option to dynamically map your program content. This will help you to create personalized messaging programs and effortlessly collect additional information on your targets. Once the conditions for your Response Program have been set, the platform will do the rest of the hard work.
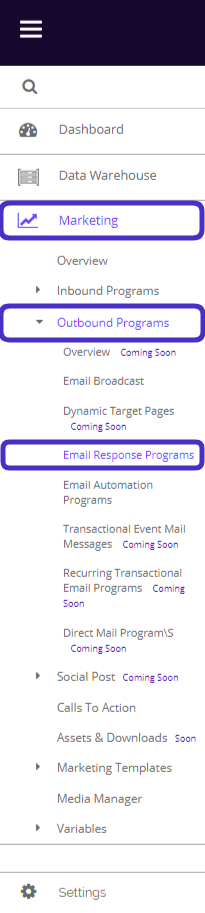
To access Email Response Programs, navigate to Marketing > Outbound Programs > Email Response Programs.
This is what the Email Response Programs Index looks like:
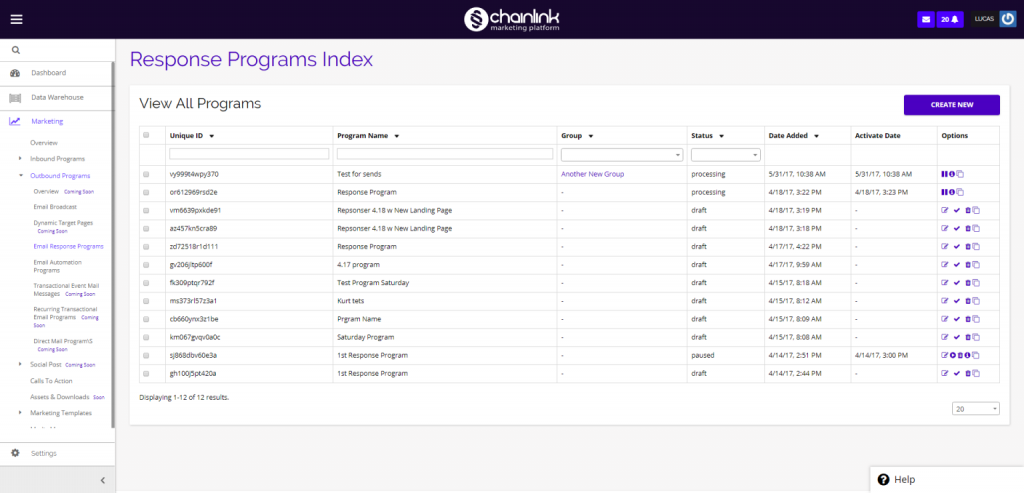
From the Response Programs Index, you can create new response programs, as well as view/edit, pause, activate, duplicate or delete any of your current email response programs from the options column on the far right. You can also view your Response Program Analysis Reports if your program is live or is already completed.
1. Create New Email Response Program
- To create a new email response program, click the Create New button in the top right corner of the page. You will then be brought to a New Response Program page where you can begin filling out the basic program details and implementing the first steps of your workflow.
- Enter the program name, group, and segments before moving on to the email section.
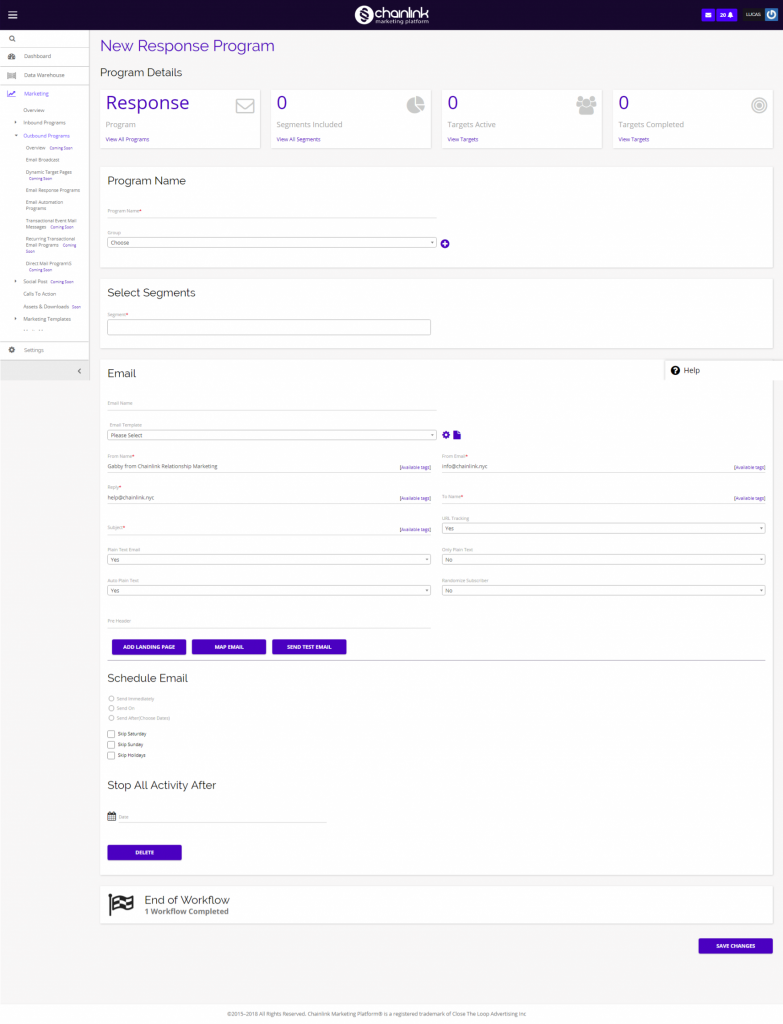
Add Email:
- In the Email section, you have the option of using an existing Email Template or building your own email using the HTML Code editor or the Drag & Drop editor.
- For more information on how to use the HTML and Drag & Drop Editors, take a look at the Email Broadcast Knowledge Base.
- Choose an existing email template from the drop-down, or create a new template by clicking on the page icon to the right of the drop-down.
- You can edit the selected email template by clicking the pencil icon next to the template name.
- Note: If you plan on including a Landing Page in the email content, be sure to add the tag [LANDING_PAGE_URL] somewhere in the body of your email. Using this tag will automatically upload the correct landing page URL from the page you select in the coming landing page step.
- Note: If you select “Yes” for Plain Text Email, a plain text version of your email will be sent to those Targets whose email providers do not allow the original email to reach the inbox. An email provider can reject an email from a Target’s inbox if the email contains ‘spammy’ looking content.
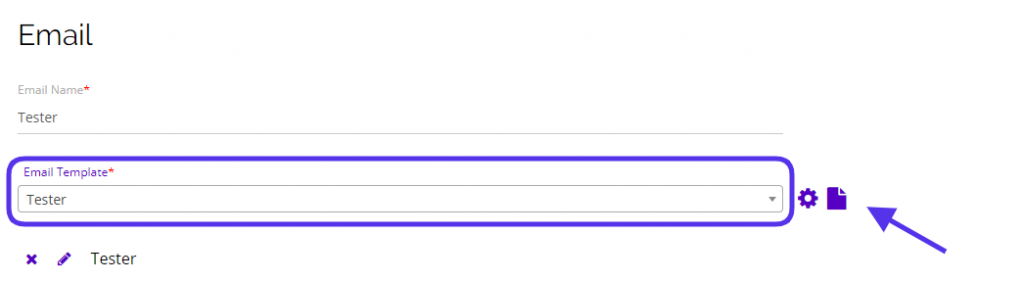
- If you want to dynamically map your email , click the Map Email button and the Outbound Email Mapping pop-up will appear.
- Email mapping is useful if you want add personalized content for every target in a segment you are sending to.
- Note: You must have the variable you want to map somewhere within the email. You can add a variable using {variable} anywhere in the body of your email.
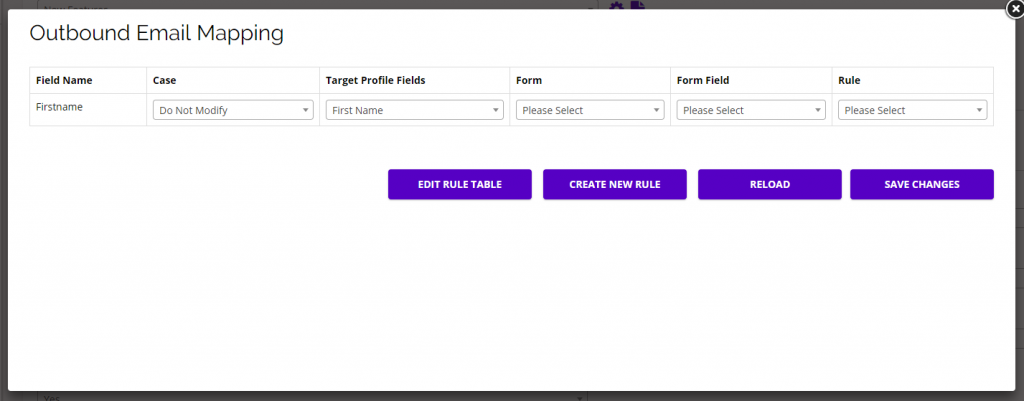
- In the example below, we are mapping the variable {Firstname} in the email content with the profile field First Name in the platform.
- When this program is sent, wherever the {Firstname} variable appears in the email, the Target’s first name from the platform will populate the variable.
- The Field Name is the same variable name used in your email content, and the Target Profile Field is the profile field from the platform that will be used for each Target.
- You can ignore the Form Fields when mapping emails.
- You can also save custom rules for each field you are mapping to decide the mapping process/type.
- Note: You do not need to create rules to successfully map your emails.
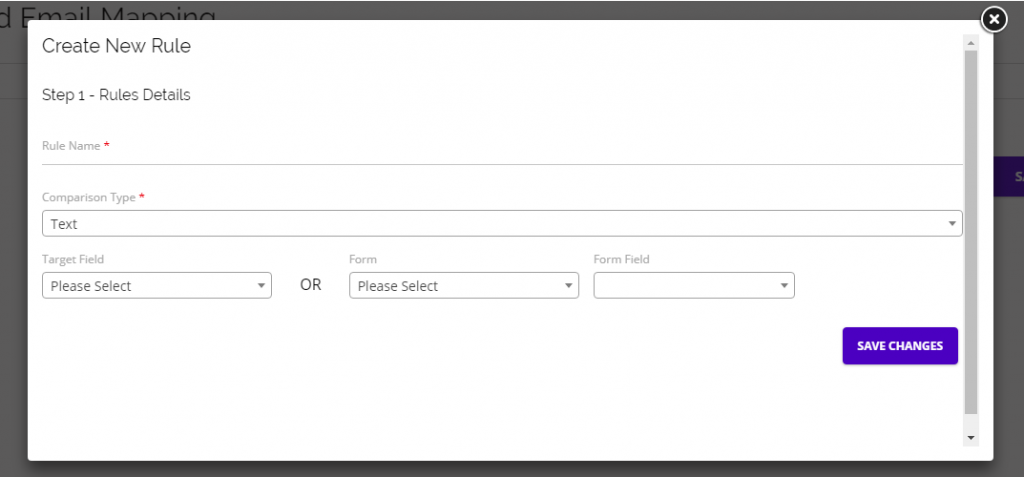
- After clicking Create New Rule, a pop-up form will appear where you can add the rule name, type, target field OR form and form field.
- When creating outbound email mapping rules, use the Target Field, not the Form/Form Field.
- Once your rule is created you can select it for your variables in the Rule drop-down.
- After selecting the rule from the drop-down, click Edit Rule Table to set up the specific conditions for the mapping process.
- After adding your program, segment, and email information, you then have the option of attaching a custom landing page.
Add Landing Page:
- The next step in building your workflow is to attach a landing page (adding a landing page to your email response program is optional).
- Attaching a landing page is useful if you want to direct Targets from your email to one of your Landing Pages. Adding the landing page here will allow the Chainlink Marketing Platform to track page visits stemming from your email. (A normal email broadcast is unable to track landing page visits)

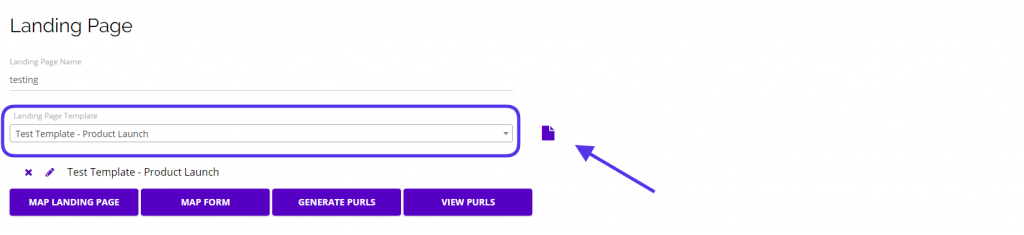
- Click the Add Landing Page button, input the landing page name and select which template you want to use, or build your own landing page by clicking on the page icon to the right of the template options.
- To edit an existing page template, click the pencil icon next to the selected template and select the template from the drop down. The page template will then load, allowing you to make any edits you want.
- For more details on how to build your own Landing Page, visit the Landing Page Knowledge Base.
- Note: To include your Landing Page in the email content, be sure to add the tag [LANDING_PAGE_URL] somewhere in the body of your email. Using this tag will automatically upload the correct landing page URL for the page you select here.
- Decide if you want to dynamically map your landing page or a form on that page and follow the same mapping steps as email mapping. (Add a {variable} in the body of your page to create personalize landing page experiences for your Targets)
- Form mapping is slightly different, because it allows you to update a Target’s platform profile information based on the information they provided in their form responses.
- Note: You can only map a form if there is a form present on your selected landing page.
Generate PURLS:
- Next, you have the option of creating PURLS (Personalized URLs) for every target that visits your landing page. These PURLS can be customized based on any profile information you have on your Targets (Name, Email, etc.)
- Note: Creating PURLS is optional, but can help with creating more personalized marketing interactions with your Targets.
- Click the Generate PURLS button and you will be brought to this page where you can customize personal URLs for the Targets that visit your Landing Page:
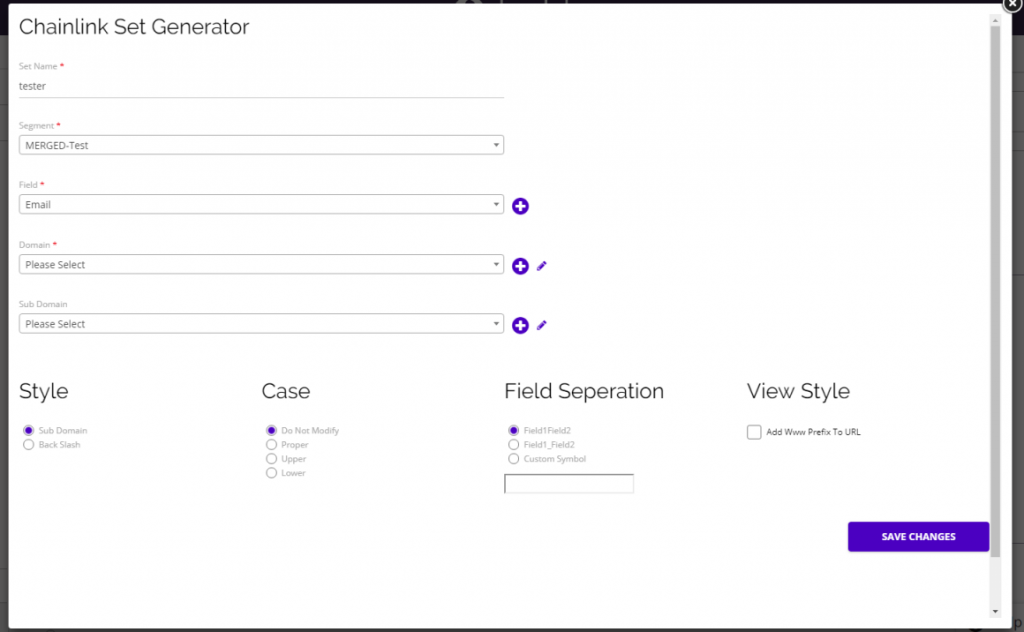
- Enter the set name, segment, fields, domains, sub-domains, style, case, field separation, and view style, and click Save Changes when finished.
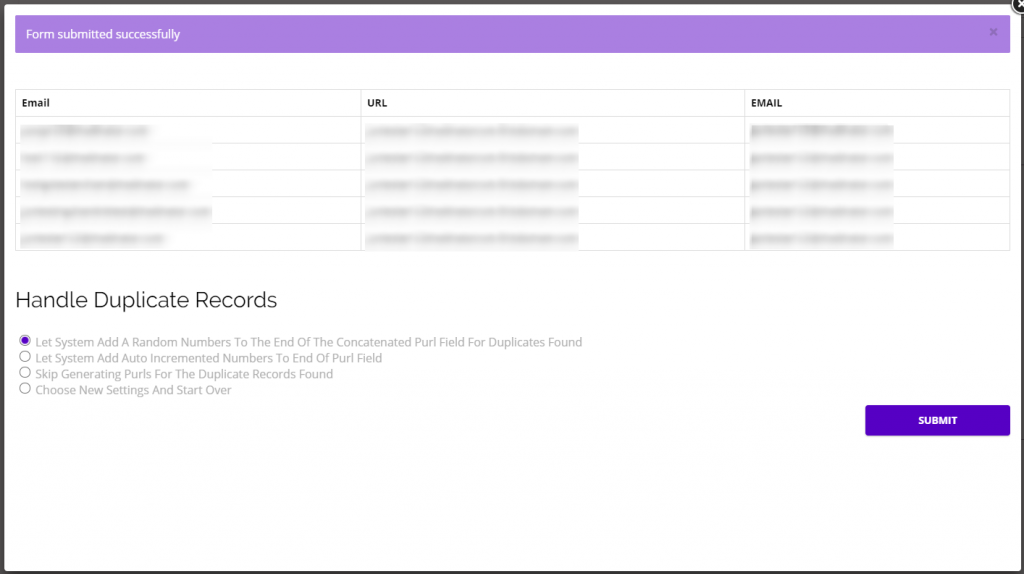
- You will then receive a notification that your PURLS were created successfully and you will be redirected to a page showing the list of Targets and their PURLS.
- You will have some final options related to the actions the platform should take if any duplicate PURLS have been created.
Schedule Email:
- Once you have finished adding your email, landing page, and form, and you are happy with the response conditions you have set up for the program, you can schedule when the email response program will be sent out.
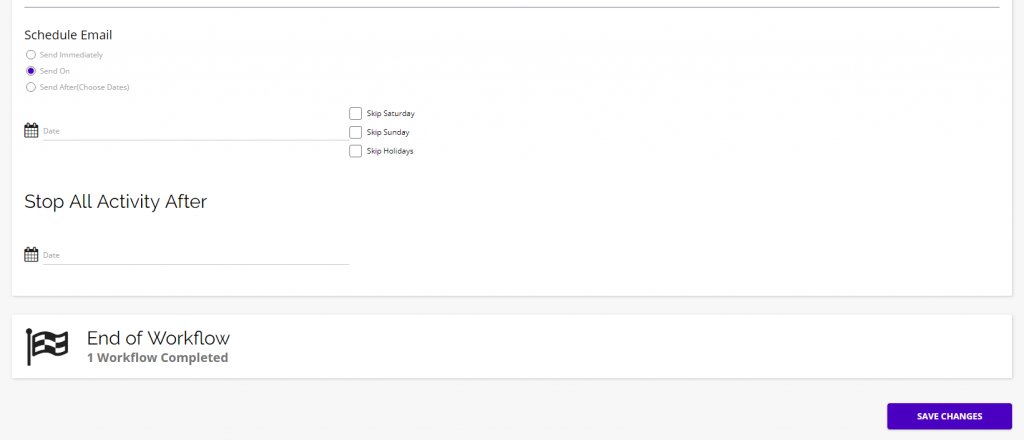
- You can schedule your Email Response Program to be sent immediately, on a certain date, or after a chosen date.
- Finish customizing your workflow by entering a date to stop all activity after, and click Save Changes when you are completely finished.
- Your new email response program will be saved and added to the Email Response Program Index.
- Note: We recommend sending out a test email to ensure everything is working properly before sending the program to your Targets.
- To activate your Response Program, return to the Response Programs Index and click the activate icon (check mark) under the options column.
- Your program will then be sent at the scheduled time. You can pause sending at any time by clicking the pause icon under the options column.
- Once the Sop All Activity After Date has been reached, all sending will stop for this email response program.
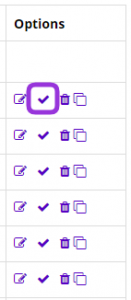
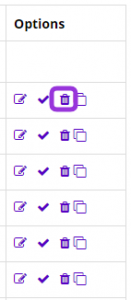
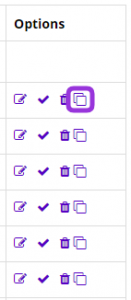
2. Options
- On the Email Response Programs Index, there are a few quick tools you can use under the options column.
Edit:
- To edit an Email Response Program you have already created, click the pencil/paper icon under the options column.
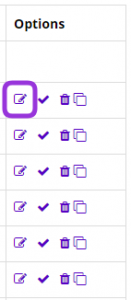
Active/Pause:
- If your program has not yet been activated, you will be able to activate it by clicking the check icon under the options column.
- If your program has already been activated, there will be a pause icon instead of the check mark that you can click to easily pause your program.
Delete:
- Delete an Email Response Program by clicking the trash can icon under the options column.
Copy:
- To make an exact copy of an Email Response Program, click the duplicate icon under the options column.
Overview:
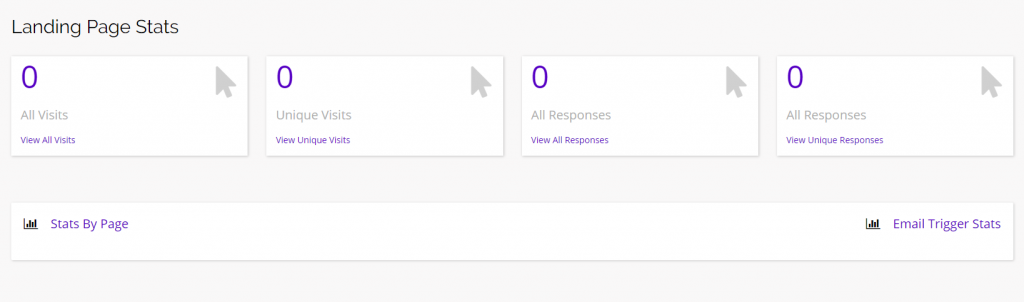
- If your program is live or is already completed, you can click the “i” icon to see an overview of that programs’ statistics including:
- Total Deliveries
- Unique Opens Rate
- Unique Clicks Rate
- Unsubscribe Rate
- Bounce Rate

- This is what the Response Program Report looks like:
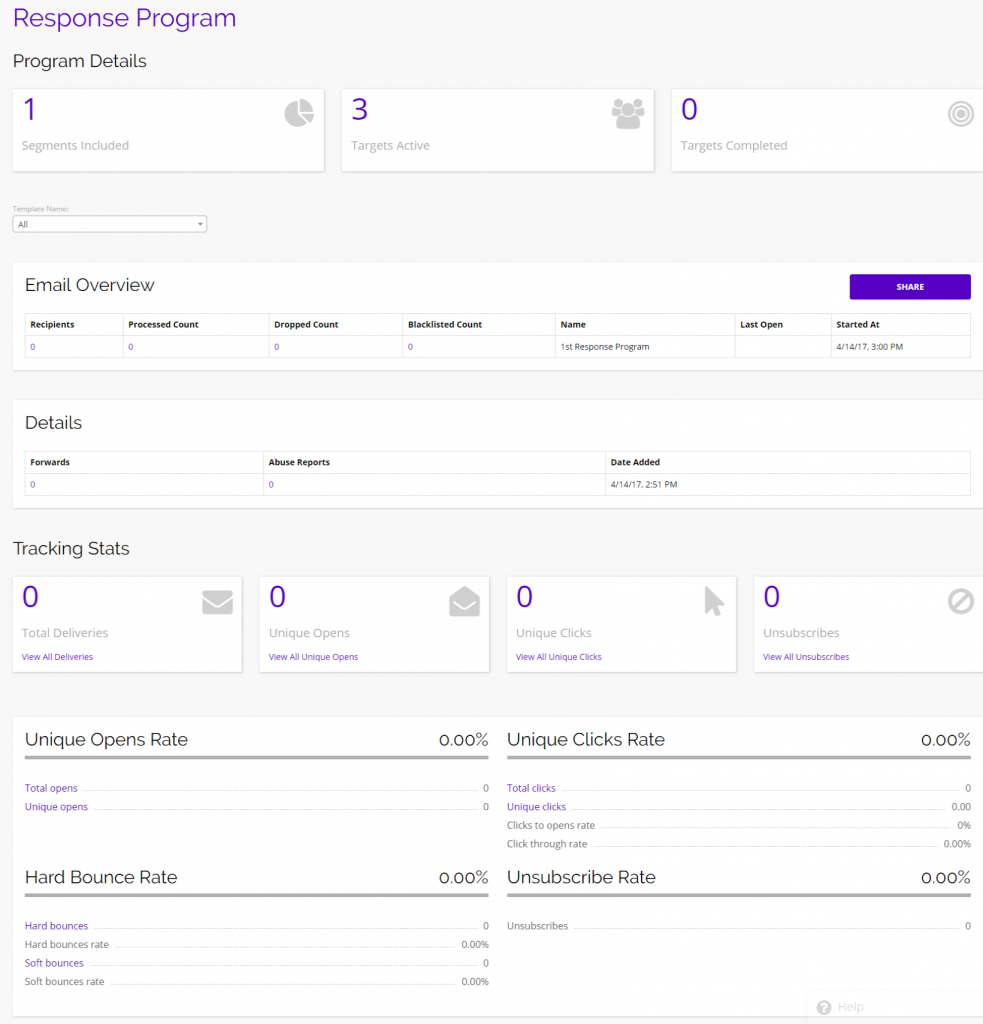
- From here you will get an overview of all of the important data and statistics related to your Email Response Program.
- If you included a landing page in your Response Program, select the template name from the drop-down at the top of this reporting page, and your landing page tracking stats will be added to the bottom of the report.
- Click on any of the highlighted reporting links to view more in-depth reporting pages.