Workflow

What’s the difference between an Email Response Program and an Email Automation Program?

Email Response Programs and Email Automation Programs are both automated workflows and share some similarities, but there are some major differences between the two.

Email Response Programs:

An Email Response Program allows you to add a single email and landing page to your workflow. The objective of a Response Program is to generate some type of response from your Targets. These responses can be as simple as clicking the link in an email to direct your Targets to a landing page, or directing traffic to your online store. Automation Programs give you more freedom to set up custom workflow conditions.

Email Automation Programs:

An Email Automation Program allows you to create complex workflows consisting of multiple emails and landing pages as well as implementing custom workflow conditions. The objective of an Automation Program is to direct Targets through a series of personalized programs based on conditions you set up. This could mean sending emails to Targets who have visited one of your landing pages, or sending personalized programs based on regular time based intervals.

What is mapping?

Mapping gives a user the ability to dynamically update a Targets’ profile information based on Target responses/actions, or use a Targets’ profile information to create personalized outbound programs.

Form Mapping gives you the ability to dynamically update a Targets’ profile based on information provided in form responses. Using form mapping, you can simply update any profile field based on the information provided in the corresponding form field. Form mapping settings can be configured when creating your form.

Landing Page and Email Mapping gives you the ability to add personalized content to a program by pulling information from a Target’s platform profile. You can use email and landing page mapping when creating standard Email or Landing pages, as well as Email Response or Automation Programs (response and automation programs give you more advanced mapping options). To dynamically map you emails and landing pages, you have to add variables or tags that make it possible to pull data from the platform.

Standard Email/Landing Pages:

The steps below will explain how to properly map variables on emails (the same steps apply to landing page mapping):

  • When creating an email broadcast, you will be able to add any standard/ custom tags that are in your platform account.
  • Once you reach the Template tab, there will be a small purple link titled “Available tags”.
  • Copy the tag from the list and paste in in the email where you want the personalized content to appear.
  • In the example below, we use the [FNMAE] tag in the email introduction, so if a Target with the first name Jake receives the email, it will read: Hello Jake,
    • The same mapping rule will occur for every Target you are sending the program to as long as you have their First Name field filled out in the platform.

chainlink marketing platform mapping

  • When sending an email broadcast, you will also have the option of updating a Target’s profile fields upon an email open. In the Setup tab, you will be able to select the profile field you want to update and the custom field value that will populate the field upon opening the email.
  • In the example below, for any Target that opens the email, their City profile field will be updated to New York.

chainlink marketing platform email mapping

Response/Automation Programs:

The steps below will explain how to properly map variables on emails (the same steps apply to landing page mapping):

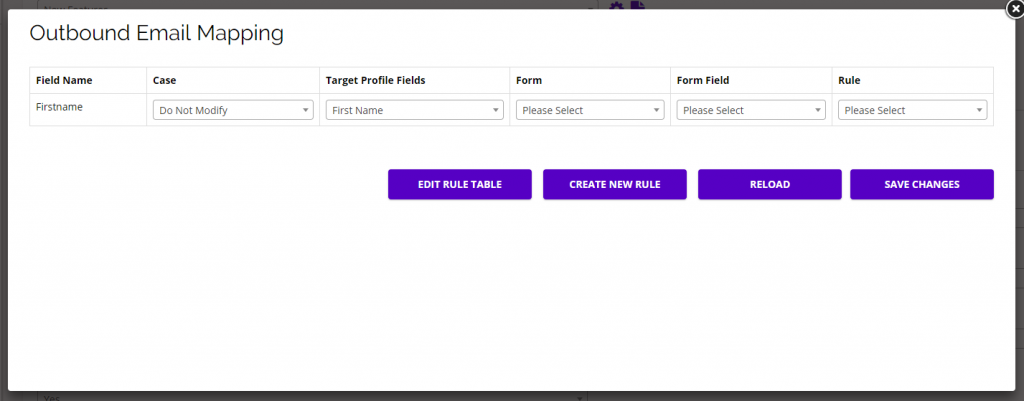
  • If you want to dynamically map your email , click the Map Email button and the Outbound Email Mapping pop-up will appear.
  • Email mapping is useful if you want a Target’s profile information to update dynamically based on certain actions your Targets take.
    • Note: You must have the variable you want to map somewhere within the email. You can add a variable using {variable} somewhere in your email content.
  • In this example, we are mapping the variable {Firstname} from the email content with the profile field First Name in the platform.
  • The Field Name is the same variable name used in your email content, and the Target Profile Field is the field that will update for each Target in the platform.
    • You can ignore the Form Fields when mapping emails.
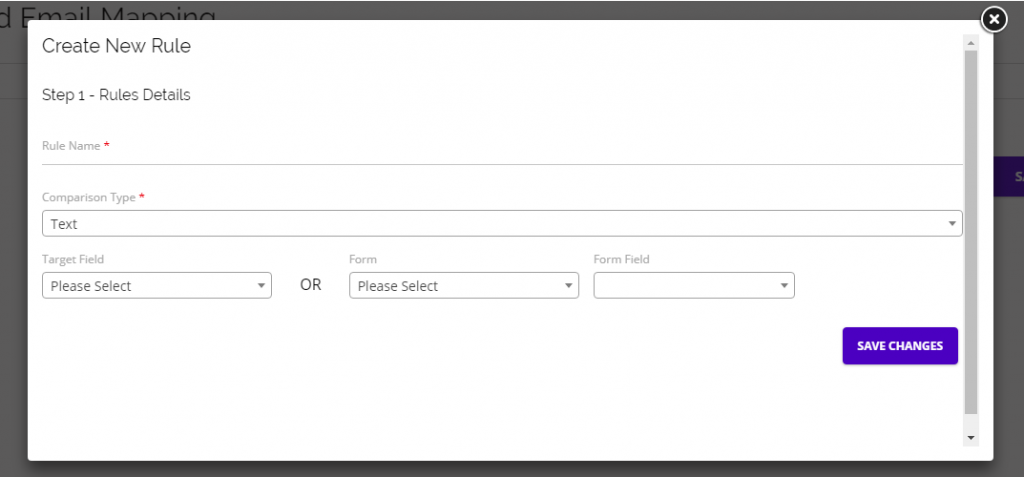
  • You can also add custom rules for each field you are mapping to decide the mapping process/type.
  • chainlink marketing platform mapping

  • After clicking Create New Rule, a pop-up form will appear where you can add the rule name, type, target field OR form and form field.
    • When creating outbound email mapping rules, use the Target Field, not the Form/Form Field.
    • Chainlink email response program create new rule
What are the different flow types in Email Automation Programs?

If you’re attempting to build an Email Automation Program, you will be presented with the option of three different flow types. Each flow type is unique and can be used for different marketing tactics.

Dynamic Flow:

A dynamic workflow is similar to a dynamic segment. It automates the program based on your targets’ interactions and behaviors. For example, with a dynamic flow, an automated email program can start on a specific date and the workflow could continue for Targets if they open the first email in the program, but stop for others who never open the first email.

Auto Sender Flow:

Auto sender flow will start the workflow for your desired segments depending solely on certain actions taken. For example, a workflow could start only for Targets who have opened a certain email, and those who do not open the email will not be included in the workflow.

Fixed Segment Flow:

Fixed segment flow will send the email program out to a fixed segment on the date specified, and will continue for every target in the segment, regardless of the actions taken. For example, you could create a fixed workflow that will send out one email every week to a desired segment and stop for every Target in that segment after 4 weeks.

How do I test workflows?

When you are building a workflow in Email Automation or Response Programs, you have the ability to test the individual steps of your workflow to ensure they’re all set up as intended. You can send test emails for every part of your workflow by clicking the Send Test Email button.

If you are having trouble with your test emails, try decreasing the time of any delays for testing purposes. A few minutes for each delay will ensure that your test contact has time to meet the appropriate criteria while going through the workflow, but is short enough for testing. If that doesn’t work, try removing the delays completely during testing.

Once you’ve tested your emails and ensured that they’re working as intended, make sure you reset your delays to the correct amount of time and finish building your workflow.

If you want to test the complete workflow, try creating a duplicate program and sending it to a segment only consisting of your email. You will be able to go through the live workflow to see if all of the delays and conditions are working properly. If everything is working as planned, activate the original program to send to your target segment.

How do I create a workflow?

A workflow is a group of programs with a set of conditions that dictate when your marketing programs will be sent out to your Targets. There are two ways to create a workflow in Chainlink’s Marketing Platform; Email Response Programs and Email Automation Programs. You can find both of these programs by navigating to Marketing > Outbound Programs.

Response programs are basic workflows that you can attach an email and landing page to. Response Programs are useful if you are looking to collect additional information on your targets without implementing too many specific conditions. To create an Email Response Program, add an email/landing page, schedule when it should be sent out, and schedule when the program should stop all activity. Take a look at our Email Response Program Knowledge Base for more information on how to build an Email Response Program.

Automation Programs are more complex workflows that allow you to segment your flow based on specific timing and actions taken by your targets. These programs allow you to add an unlimited number of emails/landing pages and conditions to hone in on a specific group of targets based on the actions they take related to your programs. To create an Email Automation Program, select a flow type, add and schedule your emails/landing pages, add any time or action based conditions, and schedule when all activity for the program should stop. Take a look at our Email Automation Program Knowledge Base for more information on how to create automation programs.