When adding a form to a landing page, the form preview you will see in the page builder is only a placeholder preview image of your form. To see the true layout of the form on your landing page, you must first save your changes and click Preview. The layout of your page preview is what your landing page, and all of the elements on that page, will look like when the page goes live.
What is the differnce between a section and a column?
Building landing pages using Chainlink’s Drag & Drop Editor is extremely easy, regardless of your web development experience. The Drag & Drop Editor has a number of different tools that can seem a little confusing if you are new to the platform. Under the Layout Blocks section of the builder, you will see 5 options to choose from: Section, 1 Column, 2 Columns, 3 Columns, and 2 Columns 3/7.
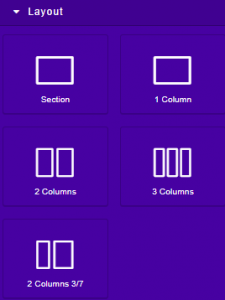
The first thing you should do when building a landing page is place a Section. All of your other landing page elements should be placed within a section, including columns. Once you’ve added a section, you can add columns within the section to further format and break up you landing page. Make sure you follow this rule to ensure the formatting of your page is correct on desktop, tablet, and mobile views.
What is the difference between Your Pages and Page Templates?
If you navigate to Marketing > Marketing Templates, you will notice the options “Your Pages” and “Page Templates”. You will also find the same options for Forms and Emails. Although these pages might look similar, they have some key differences.
“Page Templates” contains all of the freely available page templates provided by the Chainlink Marketing Platform. If you find a template that you want to use, click Import and you will be brought to “Your Pages”, where you can see the imported Landing Page template at the top of the page.
From “Your Pages”, you can use/edit any of the templates you’ve imported from “Page Templates”, as well as create a new Landing Page template from scratch by clicking Create New.
The way these two pages work together also applies to Form and Email templates.
What is mapping?
Mapping gives a user the ability to dynamically update a Targets’ profile information based on Target responses/actions, or use a Targets’ profile information to create personalized outbound programs.
Form Mapping gives you the ability to dynamically update a Targets’ profile based on information provided in form responses. Using form mapping, you can simply update any profile field based on the information provided in the corresponding form field. Form mapping settings can be configured when creating your form.
Landing Page and Email Mapping gives you the ability to add personalized content to a program by pulling information from a Target’s platform profile. You can use email and landing page mapping when creating standard Email or Landing pages, as well as Email Response or Automation Programs (response and automation programs give you more advanced mapping options). To dynamically map you emails and landing pages, you have to add variables or tags that make it possible to pull data from the platform.
Standard Email/Landing Pages:
The steps below will explain how to properly map variables on emails (the same steps apply to landing page mapping):
- When creating an email broadcast, you will be able to add any standard/ custom tags that are in your platform account.
- Once you reach the Template tab, there will be a small purple link titled “Available tags”.
- Copy the tag from the list and paste in in the email where you want the personalized content to appear.
- In the example below, we use the [FNMAE] tag in the email introduction, so if a Target with the first name Jake receives the email, it will read: Hello Jake,
- The same mapping rule will occur for every Target you are sending the program to as long as you have their First Name field filled out in the platform.

- When sending an email broadcast, you will also have the option of updating a Target’s profile fields upon an email open. In the Setup tab, you will be able to select the profile field you want to update and the custom field value that will populate the field upon opening the email.
- In the example below, for any Target that opens the email, their City profile field will be updated to New York.

Response/Automation Programs:
The steps below will explain how to properly map variables on emails (the same steps apply to landing page mapping):
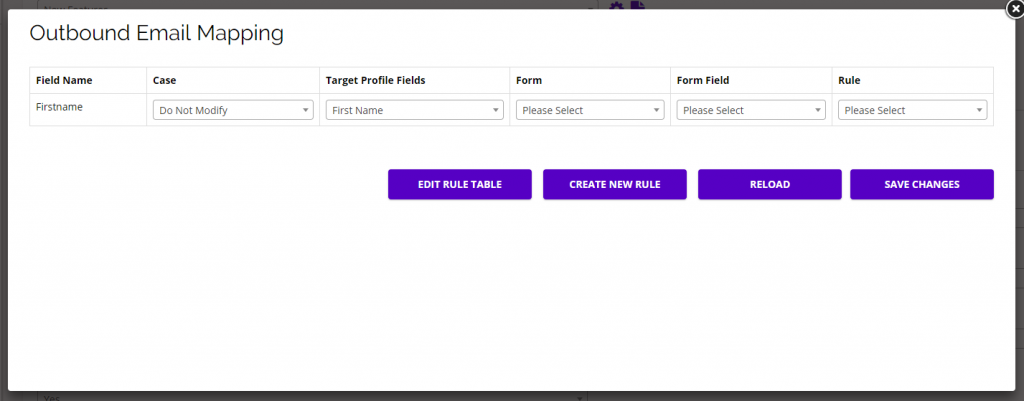
- If you want to dynamically map your email , click the Map Email button and the Outbound Email Mapping pop-up will appear.
- Email mapping is useful if you want a Target’s profile information to update dynamically based on certain actions your Targets take.
- Note: You must have the variable you want to map somewhere within the email. You can add a variable using {variable} somewhere in your email content.
- In this example, we are mapping the variable {Firstname} from the email content with the profile field First Name in the platform.
- The Field Name is the same variable name used in your email content, and the Target Profile Field is the field that will update for each Target in the platform.
- You can ignore the Form Fields when mapping emails.
- You can also add custom rules for each field you are mapping to decide the mapping process/type.
-
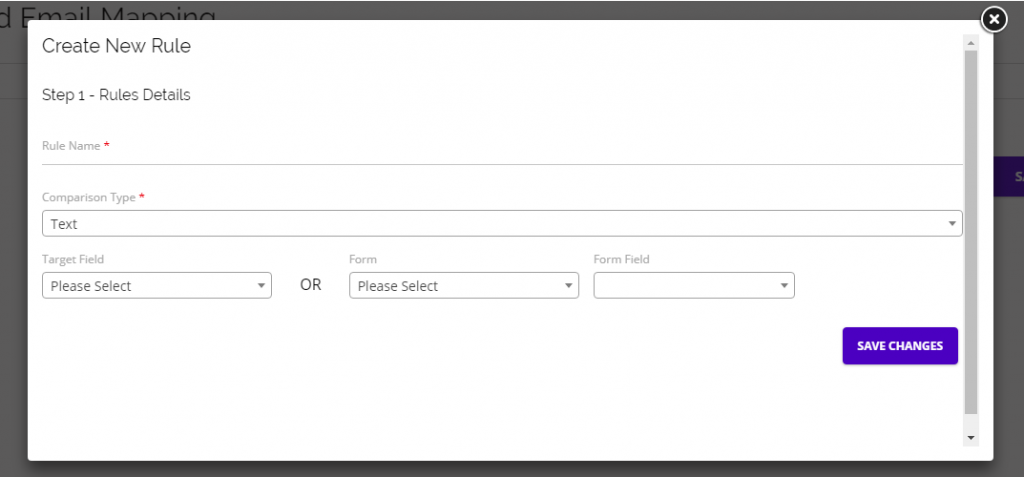
- After clicking Create New Rule, a pop-up form will appear where you can add the rule name, type, target field OR form and form field.
- When creating outbound email mapping rules, use the Target Field, not the Form/Form Field.
What are PURLS?
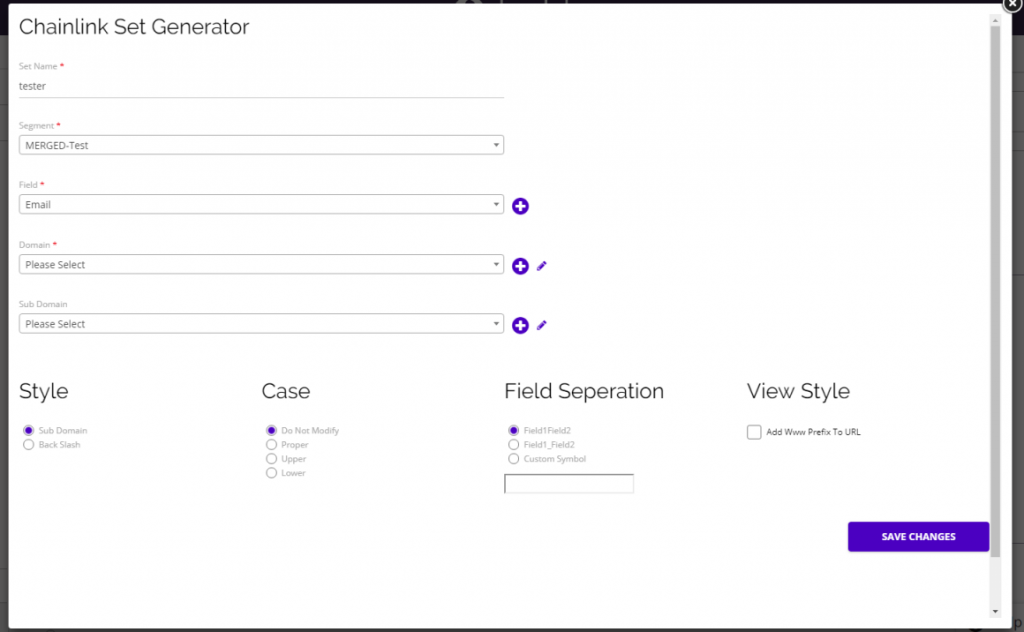
When building an email response program, you have the option of adding a landing page attached to the email you are sending out. If you decide to add a landing page to your response program, you will be able to generate PURLS for each target. PURLS stands for personalized URLS, meaning you can set the conditions to create personalized URLS for every target that visits the page based on any fields in the platform. This will allow you to create a personalized landing page experience for every target that visits the page. This can be as simple as adding the targets name or email to the URL. You are able to add any fields that are available to you within the platform. You can also choose the domain, sub-domain, style, case, field seperation, and view style. See the image below for an example of what the PURL generator looks like:
What are Blocks?
In the Drag & Drop Landing Page Builder, you will notice the menu on the right is broken into three sections: Style Manager, Layers, and Blocks.
Blocks are the standard layout, typography, and media elements that you will use to initially organize you landing page. Once your blocks have been placed on your canvas, you can edit every block or element using the Style Manager.
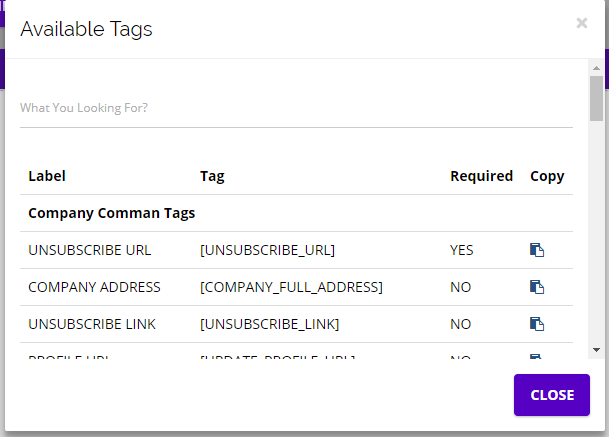
Is it possible to add personalized tags/variables to a landing page?
The same way you have the ability to add personalized tags/variables to your Chainlink Marketing Platform emails, you can customize your landing pages so they’re more personal to the visitor viewing your page. In the Drag & Drop Landing Page Builder, there will be a button at the top of the screen titled Available Tags. Click the available tags button and you will find a list of all available tags.
Simply copy any of the tags and paste them where you want on your landing page to create personalized landing pages.
How do I put a video on my landing page?
Within the Drag & Drop landing page builder, simply drag and drop the video block where you want the video to appear on your page. You will then see a placeholder video appear.
Click on the video and you will see the style manager open. Click on settings in the style manager to expand the options. From here you can select the video provider (Vimeo, Youtube, or HTML5 Source) and add the Video URL for the video you want to appear on your page.
You will also be able to edit the color, auto-play, and loop settings for your video.
How do I link off page after a target submits a form on my landing page?
After someone fills out a form on your landing page, you have three options for the target: Redirect Immediately, Display a Confirmation Message For _ Number of Seconds and Then Redirect, or Display Confirmation Message.
These options can be edited under the Submit tab when creating or editing a form. If you choose to display a confirmation message, you will be able to write the message to be displayed on the same page. If you choose to redirect off page, you can easily add the redirect URL on this page as well.
How do I create a landing page?
There are a couple ways to create a landing page in the Chainlink Marketing Platform.
If you are looking to create a landing page for one time use, navigate to Marketing > Inbound Programs > Landing Pages. Click the Create New button in the top right of your screen and enter the basic information/settings. You can then use the Drag & Drop builder to create a customized landing page.
If you are looking to create a landing page template that can be reused/edited for other inbound efforts, navigate to Marketing > Marketing Templates > Your Pages. Click Create New at the top of the page and you will be brought to the HTML editor. From there you can easily switch to the Drag & Drop Editor to create your landing page template.
Take a look at the Landing Page Knowledge Base for more instruction on creating effective Landing Pages using Chainlink’s Drag & Drop Editor.
How do I add a form to my landing page?
In the Chainlink Marketing Platform, you have the ability to add a custom form you’ve created within the platform to a landing page you’ve created within the platform. You also have the option of embedding your form on a web page that was not created in the platform.
Add form to landing page built in the platform:
- To add a custom form to your landing page, you have to be using the landing page drag & drop editor.
- Add the form block to the page and double click on the form placeholder.
- Select the form you’ve created from the pop up, or click Create New Form to open the form builder in a new tab.
Add form to web page outside of the platform:
- To embed a form on a web page that was not created in the Chainlink Marketing Platform you need to be in the form builder.
- Once your form has been designed, the embed tab gives you the option of adding your form to any web page.
- Add the URL of the page/s you want the form to live on.
- Copy the desired code from the embed tab and paste it in the code of the web page where you want the form to live.
How can I change the social media icons on a landing page?
If you add a social profile, or the social profile block to your landing page, you can easily change the social media icons within the style manager. First, select the icon you want to edit, then open the settings within the style manager for that icon. Click on the Network drop-down and you will see a list of 20 different social media networks. Click the network you want to link to and the icon will update to that social media network. If you are changing the network, be sure to update your URL to match the social media account you are linking to.