To send outbound email programs through the Chainlink Marketing Platform, we first have to verify that you are using a valid email address hosted by a domain that is accessible, and ensure that you have admin access to the domain. This will help keep your email campaigns out of spam folders and and ensure others can’t use your domain without permission.
To access Domain Verification, navigate to Settings > Domain Settings > Domain Verification.
Note: The main account user can also access Domain Verification in Default Settings from the homepage.


This is what the Domain Verification page looks like:

From here you have the ability to create a new Sending Domain, and view, edit, or delete any existing Sending Domains. Make sure the Domains on this list have the verification status “Yes” before attempting to use any of the Sending Domains to send Outbound Email Programs.
Create New Sending Domain
- To create a new Sending Domain, click the Create New button in the top right of the Domain Verification dashboard.
- Fill out your Domain name, choose your verification method (HTML or Meta Tag) and select Save Changes.
- You will then need to follow these Domain Verification steps:
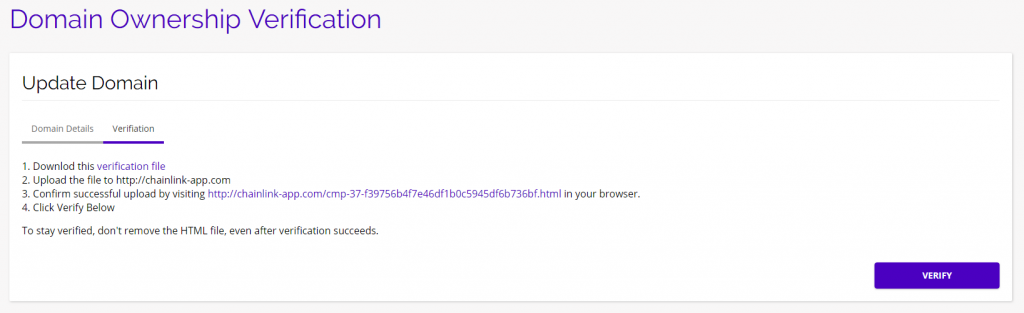
HTML:
- Download the verification file
- Upload the file to the URL listed in step 2 (this URL will be different for every Domain you are verifying)
- Confirm successful upload by visiting the URL listed in step 3 (this URL will be different for every Domain you are verifying)
- Click the Verify button at the bottom of the listed instructions
Meta Tag:
- Copy the Meta Tag below and paste it into your site’s home page. It should go in the <head> section, before the first <body> section.
- Click the Verify button below the instructions. To stay verified, don’t remove the meta tag, even after verification succeeds.

Update Sending Domain
- From the dashboard you will get a quick overview of current Sending Domain names, their verification status, date added, and last updated.
- If you click the edit icon under the options column, you will have the ability to edit the domain details, and verify your updated domain by following the domain verification steps listed above.
- Note: To stay verified, don’t remove the HTML file, even after verification succeeds.
- To delete an existing domain, click on the trash can icon under the options column.